19 Giu 2013 |
Questa installazione di Ntop è stata testata sulla distribuzione Ubuntu Server 12.04.2 i386.
La maggior parte delle guide su internet fanno installare Ntop dal gestore dei pacchetti (apt o yum), ma per questa guida ho deciso di installare Ntop dai sorgenti, in questo modo siamo sicuri di installare l’ultima versione disponibile.
[Passo non verificato (perché l’installazione di prova è stata fatta da root): creare l’utente ntop ed effettuare tutti i passi con questo utente]
Download sorgenti:
$ wget http://downloads.sourceforge.net/project/ntop/ntop/Stable/ntop-5.0.1.tar.gz
Copiarlo nella cartella desiderata:
$ sudo cp ntop-5.0.1.tar.gz /usr/src
$ cd /usr/src
Scompattarlo:
$ tar xzf ntop-5.0.1.tar.gz
$ cd ntop-5.0.1
Installare (perché verrà richiesto):
$ sudo apt-get install build-essential libtool automake autoconf libpcap-dev libgdbm-dev zlib1g-dev rrdtool librrd-dev libssl-dev python-dev libgeoip-dev graphviz libgraphviz-dev
Installare (perché verrà richiesto):
$ sudo apt-get install subversion
Lanciare:
$ sudo ./autogen.sh $ sudo make $ sudo make install
$ sudo ldconfig
(preso dal man: “ldconfig creates the necessary links and cache to the most recent shared libraries found in the directories specified on the command line […]”)
Nel caso si stia utilizzando l’utente ntop, seguire quanto suggerito dal terminale:
************************************************************ ************************************************************ WARNING: This install created a directory for the ntop files and databases: /usr/local/share/ntop This directory MUST be owned by the user which you are going to use to run ntop. The command you must issue is something like: chown -R ntop.ntop /usr/local/share/ntop or chown -R ntop:users /usr/local/share/ntop man chown to check the syntax for YOUR system ************************************************************ ************************************************************
Altrimenti:
$ chown -R nobody:nogroup /usr/local/var/ntop
Lanciare Ntop
$ sudo ntop
Viene chiesto:
Please enter the password for the admin user:
[Inserire una pwd per l’admin di ntop. Sarà quello usato nell’interfaccia Web]
Nota: ciò si faceva in precedenza con:
#ntop -A
A questo punto, dal browser, accedere all’indirizzo del server ntop:
http://x.y.z.k:3000
14 Feb 2012 |
Oltre al semplice NET USE, in PowerShell è possibile usare il ComObject “WScript.Network” per gestire la mappatura di un disco di rete (map network drive).
Questo semplice script serve per mappare un disco di rete e per rimuovere la mappatura:
Write-Host "] Mapping Network Drive . . ." # Credentials $serverName = 'TESTPC01' $userName = 'TESTPC01\Administrator' $serverPwdSec = Read-Host -assecurestring "] Server password" # Ask for the user password $serverPwd = [System.Runtime.InteropServices.Marshal]::PtrToStringAuto([System.Runtime.InteropServices.Marshal]::SecureStringToBSTR($serverPwdSec)) $network = New-Object -ComObject WScript.Network try { # Previous method: NET USE T: \\$serverName\folderTest /USER:$userName $serverPwd $network.MapNetworkDrive("T:", "\\$serverName\folderTest", $false, "$userName", "$serverPwd") # $network.MapNetworkDrive("T:", "\\$serverName\folderTest") # Without credential Write-Host "] Network Drive mapped!`n" -BackgroundColor Green -ForegroundColor Black; } catch { Write-Host "[An error occurred in drive mapping!]" -BackgroundColor Red -ForegroundColor Black; Write-Host "[Error message:" $_.Exception.Message "`n" -BackgroundColor Red -ForegroundColor Black; } Write-Host "] Remove Network Drive . . ." try { $network.RemoveNetworkDrive("T:") # Previous method: NET USE T: /delete } catch { Write-Host "[An error occurred in drive unmapping!]`n" -BackgroundColor Red -ForegroundColor Black; } 14 Feb 2012 |
Questa funzione in Powershell permette di inviare e-mail tramite Outlook (che deve essere in esecuzione).
E’ basata sullo script presente su: http://www.andyparkhill.co.uk/2010/08/send-outlook-email-via-powershell.html a cui ho effettuato delle modifiche per l’invio dell’email a più destinatari e per l’invio degli allegati.
function Send-Email ( [String[]]$recipientEmail = $(Throw "At least one recipient email is required!"), [String]$subject = $(Throw "An email subject header is required!"), [String]$body, [String]$attachment ) { $outlook = New-Object -comObject Outlook.Application $mail = $outlook.CreateItem(0) $recipientEmail | ForEach-Object { $mail.Recipients.Add($_) } | Out-Null $mail.Subject = $subject $mail.Body = $body # For HTML encoded emails # $mail.HTMLBody = "<HTML><HEAD>Text<B>BOLD</B> <span style='color:#E36C0A'>Color Text</span></HEAD></HTML>" if ($attachment.Length -ne 0) { $mail.Attachments.Add($attachment) # | Out-Null } $mail.Send() # Write-Host "] Email sent!" -BackgroundColor Green -ForegroundColor Black; } # Main Script Body Write-Host "] Start sending mail via Outlook . . ." [String[]]$recipientEmail = 'mail_1@domain.test','mail_2@domain.test','mail_N@domain.test' $subject = "This is a test" $body = "Test test test" # Optional $attachment = "C:\Temp\test.txt" # Optional if (Test-Path $attachment) { Send-Email -recipientEmail $recipientEmail -subject $subject -body $body -attachment $attachment } else { Send-Email -recipientEmail $recipientEmail -subject $subject -body $body } # End of Script Body
7 Ago 2011 |
Se dopo aver lanciato yum update:
[usertest@fedoratest ~]$ sudo yum update
 [sudo] password for usertest:
Compare:
Loaded plugins: langpacks, presto, refresh-packagekit
 fedora/metalink | 33 kB 00:00
 http://fedora.mirror.garr.it/mirrors/fedora/linux/releases/15/Everything/i386/os/repodata/repomd.xml: [Errno 14] curl#56 - "Network error recv()"
 Trying other mirror.
 ftp://ftp.ciril.fr/pub/linux/fedora/linux/releases/15/Everything/i386/os/repodata/repomd.xml: [Errno 14] curl#7 - "Couldn't connect"
 Trying other mirror.
 http://mirror.nl.leaseweb.net/fedora/linux/releases/15/Everything/i386/os/repodata/repomd.xml: [Errno 14] curl#56 - "Network error recv()"
 Trying other mirror.
 [...]
Potrebbe essere necessario impostare il vostro proxy nel file yum.conf. Quindi andiamo ad editare tale file:
[usertest@fedoratest ~]$ sudo gedit /etc/yum.conf
e aggiungiamo le seguenti righe al suo interno, dopo il tag [main]:
proxy=http://proxy.mioDominio.it:portaDelProxy
 proxy_username=nomeUtente
 proxy_password=miaPassword
Es:
[main]
 proxy=http://proxy.gabriele.it:8080
 proxy_username=gabriele
 proxy_password=My_V3rY_Str0Ng_P4$$wW0rD!
 cachedir=/var/cache/yum/$basearch/$releasever
 keepcache=0
 debuglevel=2
 ...
N.B. 1: ricordatevi che il file yum.conf è aperto in lettura a tutti gli utenti… la password è scritta in chiaro…
N.B. 2: a quanto parte Fedora Core 15 ha un bug per l’impostazione del proxy. Leggi qui.
20 Gen 2011 |
Mentre avviavo una Debian, ho visto dei messaggi che mi hanno insospettito:
SIOCSIFNETMASK: No such device SIOCSGIFADDR: No such device eth0: ERROR while getting interface flags: no such device eth1: ERROR while getting interface flags: no such device
Facendo:
$ ifconfig
veniva visualizzata solo l’interfaccia loopback, mentre con:
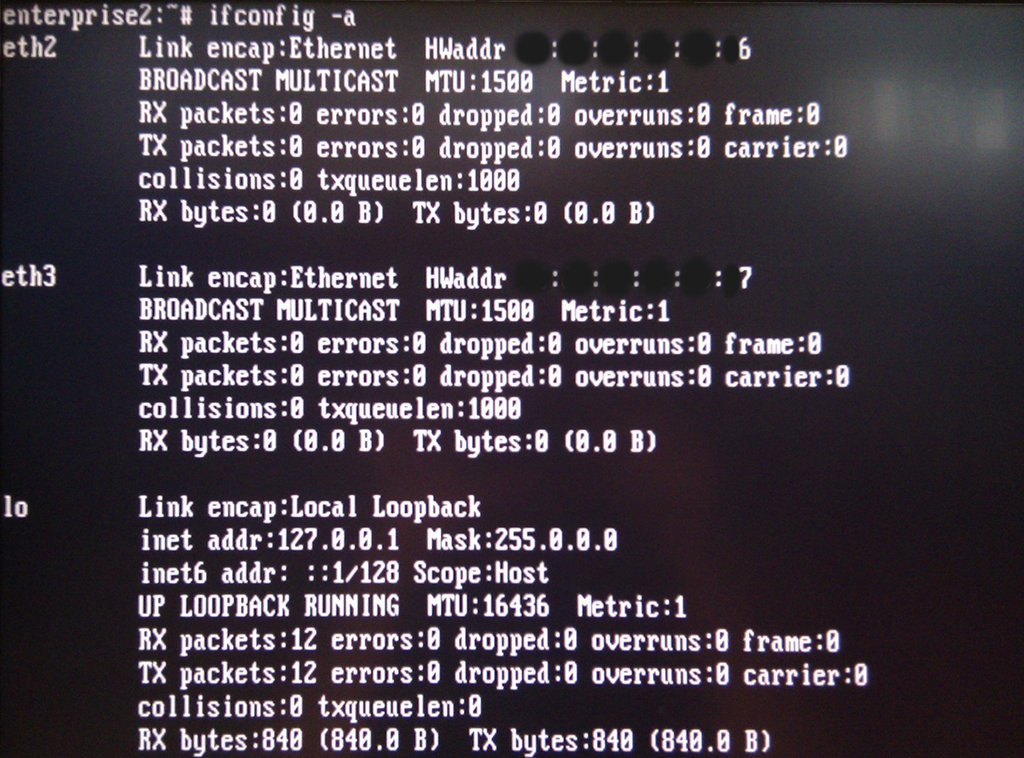
$ ifconfig -a
non c’erano più la eth0 e la eth1, ma la eth2 e eth3 (Figura 1):

Andando a vedere il log: /var/log/messages ho notato:
kernel: [..] udev: renamed network interface eth0 to eth2 kernel: [..] udev: renamed network interface eth1 to eth3
Successivamente ho controllato il file:
/etc/udev/rules.d/70-persistent-net.rules
e ho visto le seguenti righe:
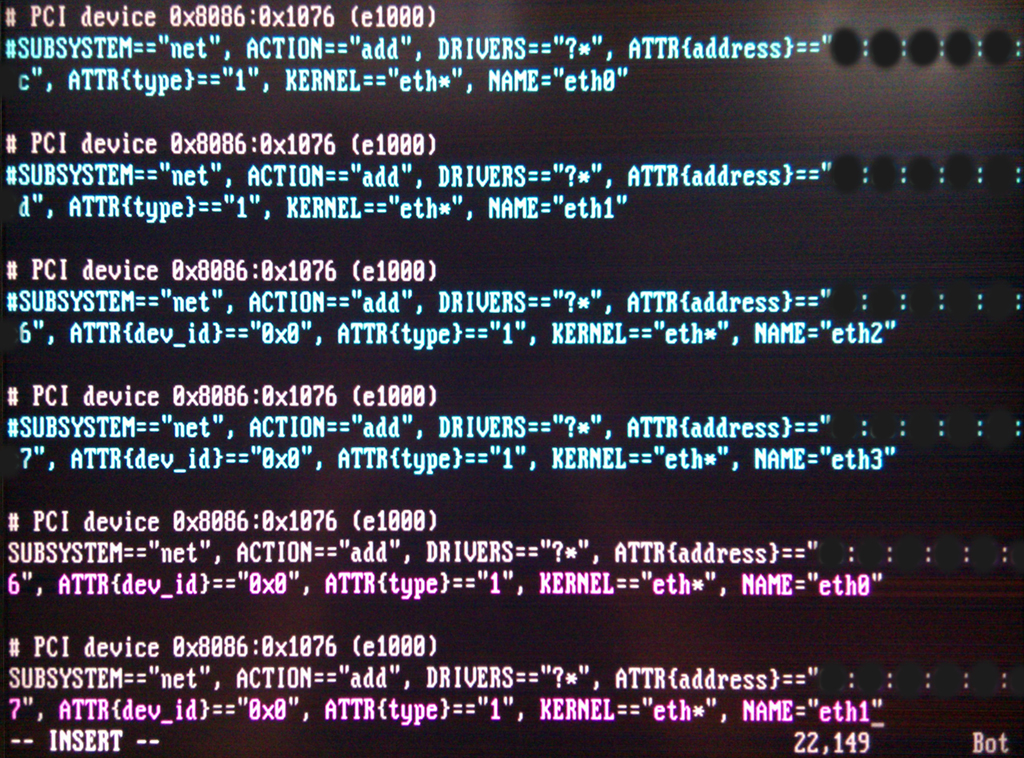
# PCI device 0x8086:0x1076 (e1000) SUBSYSTEM=="net", ACTION=="add", DRIVERS=="?*", ATTR{address}=="*:*:*:*:*:*c", ATTR{type}=="1", KERNEL=="eth*", NAME="eth0" # PCI device 0x8086:0x1076 (e1000) SUBSYSTEM=="net", ACTION=="add", DRIVERS=="?*", ATTR{address}=="*:*:*:*:*:*d", ATTR{type}=="1", KERNEL=="eth*", NAME="eth1" # PCI device 0x8086:0x1076 (e1000) SUBSYSTEM=="net", ACTION=="add", DRIVERS=="?*", ATTR{address}=="*:*:*:*:*:*6", ATTR{dev_id}=="0x0", ATTR{type}=="1", KERNEL=="eth*", NAME="eth2" # PCI device 0x8086:0x1076 (e1000) SUBSYSTEM=="net", ACTION=="add", DRIVERS=="?*", ATTR{address}=="*:*:*:*:*:*7", ATTR{dev_id}=="0x0", ATTR{type}=="1", KERNEL=="eth*", NAME="eth3" A questo punto sono andato a controllare (sempre da ifconfig -a, vedi Figura 1) i MAC delle schede, ho commentato le prime due righe (con MAC diverso) e ho modificato le ultime due mettendo “eth0” e “eth1” al posto di “eth2” e “eth3” (Figura 2):
# PCI device 0x8086:0x1076 (e1000) #SUBSYSTEM=="net", ACTION=="add", DRIVERS=="?*", ATTR{address}=="*:*:*:*:*:*c", ATTR{type}=="1", KERNEL=="eth*", NAME="eth0" # PCI device 0x8086:0x1076 (e1000) #SUBSYSTEM=="net", ACTION=="add", DRIVERS=="?*", ATTR{address}=="*:*:*:*:*:*d", ATTR{type}=="1", KERNEL=="eth*", NAME="eth1" # PCI device 0x8086:0x1076 (e1000) SUBSYSTEM=="net", ACTION=="add", DRIVERS=="?*", ATTR{address}=="*:*:*:*:*:*6", ATTR{dev_id}=="0x0", ATTR{type}=="1", KERNEL=="eth*", NAME="eth0" # PCI device 0x8086:0x1076 (e1000) SUBSYSTEM=="net", ACTION=="add", DRIVERS=="?*", ATTR{address}=="*:*:*:*:*:*7", ATTR{dev_id}=="0x0", ATTR{type}=="1", KERNEL=="eth*", NAME="eth1"
Dopo aver fatto ciò, ho riavviato ed è tornato tutto come prima.
SIOCSIFNETMASK: No such device
SIOCSGIFADDR: No such device